Hi ho, hi ho, it's off to forth we go... But enough already 🙂.
Forth was one of my baby languages. Fresh out of college, having learnt some Fortran, Basic, and Z80 assembler, I did a project using Forth for what was going to be a Sinclair product ( though it never hit the street in this form ). I have very fond memories of it, because it was far more productive than Basic or assembler ! At the time, compilation could be a slow business, so Forth was a great tool.
However, for creating mainstream PC programs it was always clear that Forth was never going to be the language of choice. It was not designed for large scale development because it had little support for modularity or scoping, it wanted to be the OS, and although valiant efforts were made to show that it could even be 'object oriented' if you tried, it was simply not the best tool for the job for a variety of reasons, not all of them technical.
The advent of hypercheap embedded controllers like PIC, Atmel, ARM and ESP/Tensilica devices has brought Forth back into focus in the course of the last 15 years or so. Although C/C++ and dialects thereof will continue to be the main languages for these things, Forth's simplicity and consequent hackability lends itself to customisation for low volume, ( relatively ) low resource targets. That strength is also something of a weakness - so many Forth's are out there that deciding which one bests suits your purposes is a task in itself, particularly if you're looking for an OSS/free solution.
What follows is a stream-of-conciousness stylee description of my efforts to put a Forth on an Arduino UNO. TL:DR It's a bumpy ride, but in the end, it works 🙂.
This appears on the face of things to be designed for the lower spec Arduino devices, many of which I already have. It seems to have a userbase sufficiently large that some degree of support may be available, which is also good.
But it has some characteristics I don't like too. The documentation could do to be improved - there are gaps and assumptions, and some guesswork is definitely required. The build system relies on Windows executables, and hence on Wine. Having to install a Windows emulator just to run an assembler is frustrating.
Perhaps this is down to Atmel ( now owned by Microchip ) as much as anything - Atmel's support for Linux has been poor. There is an OSS assembler for AVR devices ( see this discussion of avr assembers ), but apparently it can't be used as a drop-in replacement for the Atmel one.
FlashForth has somewhat better written documentation than AmForth, but also the same drawback - if you need to build it from scratch, it relies on Wine.
However, FlashForth has the considerable advantage of supplying a prebuilt hex file for the UNO and the Mega2560, both of which are targets of interest.
These files are available here :
https://github.com/oh2aun/flashforth/tree/master/avr/hex
Note that the names of the files here are not the same as those referred to in the FlashForth documentation ( ff_uno.hex, ff_mega.hex ). I'm assuming this is because gitHub master now supplies more than two hex files, and hence the naming convention has been changed. It's clear which is for the UNO - 328-16MHz-38400.hex.
Therefore as a first stab, I'll go with FlashForth.
Be careful when downloading this hex file. In gitHub, right clicking on this file and saying 'save link as' doesn't give you the hex file. You need to click on the filename, then select the 'raw' option button, and save that page from your browser. Or, of course, you can just grab a zip of the whole repo.
For reasons that aren't entirely clear to me, neither FlashForth nor AmForth play nice with the Arduino bootloader ( or indeed, any separate bootloader ). I understand that Forth wants to write to Flash to store words that you create, and that it may not be possible to get a bootloader to do this via an API. But I don't understand why this means that the bootloader needs to be blown away. Perhaps it's just considered dead code in these circumstances. Or maybe this is more to do with flag settings than bootloader behaviour.
Anyway, this means blowing away the whole of flash on the UNO, and this in turn means using a flash programmer.
The chip on the UNO is socketed, which means that :
You can take it out, plug it into a ZIF socket, blow your code, and stick it back in the UNO.
I've done a lot of this in the past, and if I wanted to make a zillion copies of AmForth, and if I currently had a suitable flash programmer, then I could do this. But it doesn't make much sense for me - I don't need loads of devices, and an entire UNO clone costs just a few pounds more than the raw Atmel chip, so I'm not going to save money buying or making a ZIF socket flash programmer and programming a handful of devices.
You can buy a preprogrammed FlashForth chip from the FlashForth author (see https://flashforth.com/atmega.html).
This isn't such a bad deal - it's the 'minimum hassle' option for sure. But for less than one preprogrammed AT328p, I can get a USBAsp...
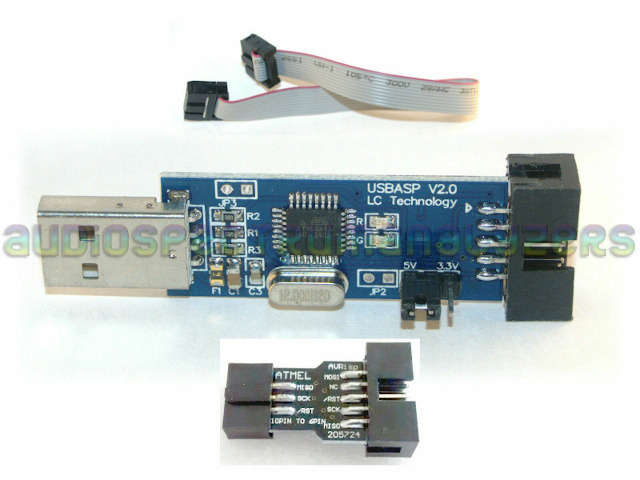
So I've got a USBAsp, which is not a computer based device for killing Egyptian queens, but a small device that understands the Atmel flash programming protocol and supports the ICSP ( In Circuit Serial Programming ) hardware interface. You plug it in to the UNO 6 pin ICSP header on one side, and your development machine on the other.
Note that there are two ICSP headers on the UNO board, because there are actually two processors, one of which is used for implementing the UNO USB interface. Don't blow that one away.
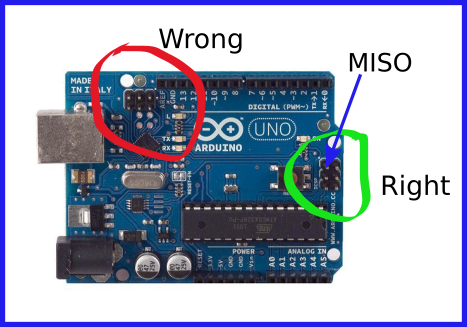
You do need to plug the USPAsp cable in the right way round. You'll probably be using a 10-pin to 6-pin adapter to make the connection unless you've somehow rolled your own USBAsp ( people do... ). The header on the UNO is not keyed, but the cable between the USBAsp and the adapter is. You need to have the red wire on the ribbon cable on the side away from the processor. This maps the MISO pin on the USBAsp to the MISO pin on the header, and all is good. If you're doing it with jumper wires, you're being very careful, right ?
As it turns out, the physical connection is the trivial part. And the logical connection ( i.e. making the device visible to the programming software on the development box ) is also trivial - eventually.
I'm using Linux, which means that the software I need to use to perform this programming task is avrdude.
I managed to get quite confused by the question of how to point avrdude at the USBAsp. My mistake was to think that the USBAsp should present itself as a serial device ( i.e. a /dev/ttyXXX of some sort ). This came about from reading the AmForth documentation that referred to '/dev/ttyUSB'. I spent a while trying to work out where my serial device was. Certainly there are programmers which operate via a tty-like serial interface.
But the USBAsp does not pretend to be a teletype. It's a USB device and that's that. I eventually RTFM'd the voluminous avrdude man pages, and managed to work out that avrdude could happily find the programmer just by knowing the ( standard ) USB vendor and device id's. All I needed to do was tell it what type of programmer it had. You don't need the '-P' option at all ( but you do need the '-p' option 🙂 ).
Neither do you need to do anything with udev rules, if you have no need to restrict access to this hardware. There are many examples around the net of udev rules for the USBAsp, but they do nothing except limit access. avrdude does not need any sort of mapping to identify and use the device ( i.e. it's 'identity' is at no risk of changing from one session to another, because it's based on constant values supplied by the device ), and the udev permission defaults allow anyone to read and write. So unless you believe that world rw with a root owned device is a sin, or you need a friendly device name for some other reason, you don't need to create udev rules for it.
So the gist of the matter is this - from the POV of avrdude, you can just plug the damn thing in and it will work.
So at this point, having plugged the USBAsp correctly into your UNO ( you don't need anything else connected, just the ICSP header ) you can do this :
mark@z800:~$ avrdude -p m328p -c usbasp -t

avrdude: AVR device initialized and ready to accept instructions

Reading | ################################################## | 100% 0.00s

avrdude: Device signature = 0x1e950f (probably m328p)
The '-p' parameter selects the type of processor, the '-c' parameter specifies the programmer, and the '-t' parameter simply indicates that an interactive terminal session should be started. Exiting the terminal session is done by typing 'quit' or just Ctrl-C'ing the program.
I'm not a huge fan of safety for safety's sake, but I'm a big fan of cockup theory, and I have to admit the possibility that I may find myself in the position of having to restore the Arduino bootloader to the UNO.
There are loads of resources that discuss aspects of the Arduino bootloader. The most important thing about this from my POV is that the bootloader actually ships as a hex file ( a file that can be fed to avrdude ) with the Arduino IDE. And the Arduino IDE supports use of the USBAsp ( via avrdude ) for bootloader recovery.
In other words, just having the Arduino IDE gives me a means of recovering the board via ICSP if necessary.
So, onward and upward.
Let us construct the required avrdude command line to flash FlashForth. As it happens, this is not trivial.
We can see from the example above that we need :
avrdude -p m328p -c usbasp
We need to specify the '-e' parameter to force an erase of the flash ( in general, oversimplifying a little, flash memory has to be in an 'erased' state before it can be written to ).
We're going to write the 'fuses' aswell as the flash memory, so we need to disable protection of those fuses. This means we need to specify the '-u' parameter.
We need to write the hex file to flash. So we need a '-U' parameter that does this.
We need to write the fuse values. So we need '-U' parameters to do this too.
What are 'fuses' ? The term is a bit misleading. There are circumstances where a device has internal fuses which can be blown in much the same way as a fuse in a mains plug blows - an irreversible change is made to the device's circuitry. But this is not such a case. These fuses are, in effect, a set of toggle switches that configure the behaviour of the device, such as how it gets it's clock signal. Nothing trivial 🙂. Certainly there are combinations of settings that will cause problems and should be avoided.
This link provides a very comprehensive description: https://www.allaboutcircuits.com/projects/atmega328p-fuse-bits-and-an-external-crystal-oscillator/.
This link is the Atmel data sheet, which is the ultimate reference : https://ww1.microchip.com/downloads/en/DeviceDoc/Atmel-7810-Automotive-Microcontrollers-ATmega328P_Datasheet.pdf
I'm just going to adapt the command line given in the FlashForth documentation for the UNO. I'll specify my programmer and my hex file, and otherwise leave the command as per the documentation. Seems reasonable 🙂.
What we end up with after all this is the following command with a flash write and three fuse bytes written :
avrdude -p m328p -c usbasp -e -u -U flash:w:328-16MHz-38400.hex:i -U efuse:w:0x07:m -U hfuse:w:0xda:m -U lfuse:w:0xff:m
Which fails. To be precise, it complains about verification of the efuse setting. Basically, it turns out that the FlashForth documentation for the UNO is assuming the use of a rather outdated version of avrdude, which treats unused bits differently.
In the case of the AT328p, fuse bits are considered to be set if their value is 0, and unset if they are 1. The top 5 bits of efuse are in fact unused and hence cannot be set. The '0x07' value is attempting to unset the lower 3 bits - the value of the top 5 bits will not be changed.
But in fact what this means from the POV of the AT328p is that after the efuse write operation above, all the bits are '1', and the value is 0xff. Older versions of avrdude disregard the unused bits when reading the efuse value, and hence 'see' a value of 0x07. Newer versions read the true value of the unused bits, and 'see' a value of 0xff. Hence comparison with 0x07 fails. See Mikael Nordman's comment in the FlashForth forum : https://sourceforge.net/p/flashforth/discussion/726813/thread/323b9ded/#99b8
This would not be a problem if the verification failure did not prevent downstream writes. But it does, so we have also failed to write the hfuse and lfuse values.
So it would be nice if the FlashForth documentation could be updated here, it's only 4 years out of date...
Anyhow, the result of all this is that the efuse value should be 0xff, and now we have :
avrdude -p m328p -c usbasp -e -u -U flash:w:328-16MHz-38400.hex:i -U efuse:w:0xff:m -U hfuse:w:0xda:m -U lfuse:w:0xff:m
Does this work ?.
Yes - efuse is now written without complaint.
And no, because now we get a complaint verifying hfuse, to the effect that we have failed to write the value 0xda, and the value is actually 0xde.
What we appear to be trying to do here is to alter the size of the flash section that is reserved for the bootloader. 0xde has the BOOTSZ1 and BOOTSZ0 bits unset. 0xda has set BOOTSZ1. Table 26-7 of the Atmel data sheet says that this means we are asking for a bootloader size of 1024 words, as opposed to the default of 256 words. I don't know why this is important for FlashForth. I don't know if it is important for FlashForth. But I don't like to assume that failures are benign.
Now it did occur to me to wonder whether it makes sense to write the image to flash before changing the size of the bootloader segment ( -U parameters are actioned in the order they occur on the command line ). In general, it would seem more sensible to make configuration changes that may affect memory parameters whilst the memory is in an erased state and before writing code. So I tried this :
avrdude -p m328p -c usbasp -e -u -U efuse:w:0xff:m -U hfuse:w:0xda:m -U lfuse:w:0xff:m -U flash:w:328-16MHz-38400.hex:i
Bingo ! No complaints, break out the band, etc. The implication is that the flash state ( erased/programmed ) has some influence on the ability to reconfigure how that flash is used, but this is a dark Atmel mystery that I don't need to worry about.
So now I only need to talk to this thing....
This is as easy as hooking up a terminal emulator to the correct tty, yes ?
So unplug the USBAsp, plug in the USB cable as you normally would for Arduino interaction, and look for the relevant tty. Yep, there's /dev/ttyACM0 that looks like the critter. Might be a different number in your case.
Now, when you read the FlashForth docs about terminal emulation ( Interacting with FlashForth ), it appears that there are some critical behaviours required. Rather than mess around tweaking terminal emulator parameters, apparently there's a FlashForth supplied tool that looks like it should make life easier, called ff-shell.py.
If you go to the FlashForth site on SourceForge ( https://sourceforge.net/p/flashforth/discussion/726813/ ) you can find the latest and greatest tool, which is eulogised as "a major evolution in the tools allowing development in FORTH on ARDUINO boards." This tool is 'MyFFshell', which you get from https://sites.google.com/view/myffshell/start . But its only for Windows. Huh, great.
The FlashForth gitHub provides ff-shell.py. If you grabbed a zip of the repo to get the hex files, you'll have this already. There's also a 'graphical' tcl ( yuk ) version there. But this problem pales into insignificance next to the fact that ff-shell.py is written in python. Old python. I can't run this thing as it stands, because it has a missing dependency ( 'serial' ). After some googling, I'm guessing that it needs something called 'pyserial'. Apparently it's available as 'python-serial' for Ubuntu. But this python 2.7 version is not in the current Ubuntu repos. Usual python crap. But you can ( and must, if you wish to use ff-shell.py ) download and install this manually from https://github.com/pyserial/pyserial/releases .
And so eventually we have :
mark@z800:~/Projects/Forth/FlashForth/flashforth-master/shell$ ./ff-shell.py
port:/dev/ttyACM0 speed:38400 hw:False sw:False newlinedelay:0 chardelay:0 cc:False nl:True
Shell directives:
#cat file Show the file contents
#cd path Change working directory
#esc Make a warm start and disable the turnkey
#help Print help text for all words
#help filter Print filtered help text
#history filter Show the history
#ls {path} List files in working directory or in path
#pwd Print working directory
#send filename {startstring {stopstring}} Send a file optonally starting at line with startstring and optionally stop at line with stopstring
#warm Send ctrl-o to FF
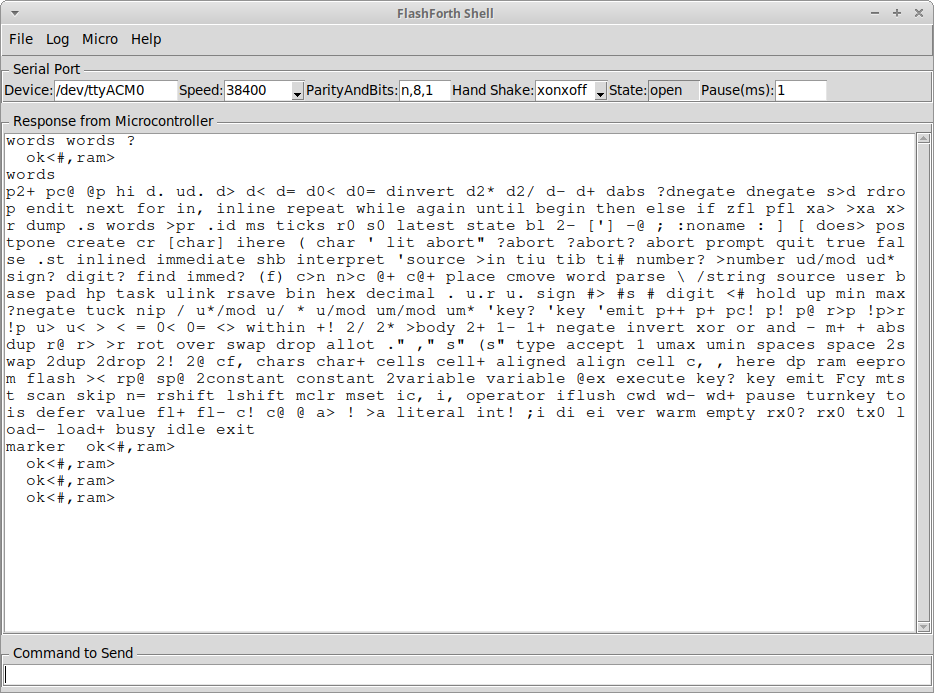
E FlashForth 5 ATmega328 18.11.2020
? ? ?
words
p2+ pc@ @p hi d. ud. d> d< d= d0< d0= dinvert d2* d2/ d- d+ dabs ?dnegate dnegate s>d rdrop endit next for in, inline repeat while again until begin then else if zfl pfl xa> >xa x>r dump .s words >pr .id ms ticks r0 s0 latest state bl 2- ['] -@ ; :noname : ] [ does> postpone create cr [char] ihere ( char ' lit abort" ?abort ?abort? abort prompt quit true false .st inlined immediate shb interpret 'source >in tiu tib ti# number? >number ud/mod ud* sign? digit? find immed? (f) c>n n>c @+ c@+ place cmove word parse \ /string source user base pad hp task ulink rsave bin hex decimal . u.r u. sign #> #s # digit <# hold up min max ?negate tuck nip / u*/mod u/ * u/mod um/mod um* 'key? 'key 'emit p++ p+ pc! p! p@ r>p !p>r !p u> u< > < = 0< 0= <> within +! 2/ 2* >body 2+ 1- 1+ negate invert xor or and - m+ + abs dup r@ r> >r rot over swap drop allot ." ," s" (s" type accept 1 umax umin spaces space 2swap 2dup 2drop 2! 2@ cf, chars char+ cells cell+ aligned align cell c, , here dp ram eeprom flash >< rp@ sp@ 2constant constant 2variable variable @ex execute key? key emit Fcy mtst scan skip n= rshift lshift mclr mset ic, i, operator iflush cwd wd- wd+ pause turnkey to is defer value fl+ fl- c! c@ @ a> ! >a literal int! ;i di ei ver warm empty rx0? rx0 tx0 load- load+ busy idle exit
marker ok<#,ram>
Yay !
Or in a window :
Personally I think I prefer the ff-shell.py version. I also think I'd like integration with VSCode and PlatformIO, but maybe that's another story.
© Mark de Roussier 2021, all rights reserved.